Webinar > Istruzioni tecniche
INSTRUZIONI
ENEA EEN KE-SMEs si basa sulle speeches/ lezioni / presentazioni offerte da relatori / formatori / presentatori e sull'utilizzo diAdobe Connect ® una piattaforma di e-conferencing ampiamente utilizzata in diverse organizzazioni per proporre seminari, conferenze ed e-learning online.
Nessun hardware o software speciale è necessario né per i presentatori né per i partecipanti.
Tuttavia si prega di scaricare l' APP Adobe connect meeting
e leggere attentamente le istruzioni seguenti:
NOTA: che tu sia un utente nuovo ed inesperto di conferenze Web o che tu sia un abile utilizzatore ma di solito usi un altro sistema di conferenza Web diverso da Adobe Connect, ti consigliamo di prestare attenzione alle seguenti informazioni. Questi consigli tornano utili dalla lezione che abbiamo imparato interagendo con più di 150 relatori ed oltre 3000 partecipanti dal vivo nel corso di quattro anni di attivita', e questo ti aiuterà a evitare problemi comuni e molto frequenti.
ISTRUZIONI AI RELATORI ED AI PARTECIPANTI
I seguenti passaggi aiutano sia i relatori che i partecipanti ad acquisire competenze nell'uso della nostra piattaforma webinar.
Gli speakers dovrebbero fare riferimento anche alla sezione specifica a loro riservata per imparare al meglio come accendere / spegnere la web cam / microfono e usarli correttamente.
Verifica il tuo computer :
- Aggiorna il sistema operativo per il tuo computer e aggiorna il tuo browser (Internet Explorer, Firefox, Chrome, Safari, ecc.) In particolare se non lo fai di frequente. Sarà un peccato che il sistema operativo (OS) o il browser del tuo computer inizieranno ad aggiornarsi durante il webinar bloccando il tuo computer e le tue attività per 10-15 minuti o più
- Installa i tuoi strumenti multimediali se non l'hai già fatto prima:
- I partecipanti hanno bisogno solo del dispositivo di riproduzione, ad esempio altoparlanti e / o cuffie. e non hanno bisogno di webcam / microfono web.
- I relatori / relatori devono utilizzare obbligatoriamente sia i dispositivi di registrazione (microfono) che quelli di riproduzione (audio). Hanno anche bisogno di una webcam (opzionale)
- Consigliamo caldamente ai relatori di utilizzare un auricolare anziché gli altoparlanti, perché il suono di questi spesso si accoppia al microfono producendo fastidiosi effetti sonori e rumore, specie con conversazioni con tre e più relatori.
Per verificare che l'audio funzioni correttamente, consultare il paragrafo successivo "Impostazioni audio e problemi"
Verifica la velocità di connessione e la sua qualità
Una solida connessione a Internet è il prerequisito essenziale per qualsiasi efficace conferenza remota. Ed è il motivo più frequente di failure insieme alla scarsa qualità dell'audio/video. Anzi una scarsa velocità di connessione si traduce anche in una voce non fluida e che si percepisce a singhiozzo, a volte con un suono metallico
Il Wi-Fi è ovviamente più comodo del collegamento cablato via cavo ad Ethernet. Ma Ethernet offre ancora vantaggi significativi in termini di stabilità e velocità e raccomandiamo caldamente in particolare ai relatori di utilizzare la connessione LAN / Ethernet con indirizzo IP-Internet Protocol assegnato, anziché una connessione Wi-Fi con IP dinamico assegnato.
All'opposto lasciamo liberi i partecipanti di scegliere la connessione più comoda
- I dati Internet vengono trasportati in piccoli blocchi chiamati pacchetti. La velocità delle connessioni è solo una parte dell'intera immagine. L'altro è la stabilità della connessione.
- Se durante la connessione si verificano perdite di pacchetti, la navigazione rallenta e provoca una riduzione della qualità audio / video.
- È possibile utilizzare un test di velocità come http://www.speedtest.net/ o qualsiasi altro tool che il lettore preferisce per testare sia la velocità di upload / download che il PING-Packet INternet Groper. l 'utility di amministrazione per reti di computer usata per misurare il tempo, espresso in millisecondi, impiegato da uno o più pacchetti ICMP a raggiungere un dispositivo di rete (attraverso una qualsiasi rete informatica basata su IP) e a ritornare indietro all'origine.
- Sono gradite velocità di connessione > 1MBpps sia per il download che per l'upload per i relatori per avere un audio ed un video fluido e > 0,4 Mbps (400 Kbps) o più veloci per i partecipanti per un audio ottimale, Un PING non superiore a 60-70 ms
- Come eseguire il check del PING più in profondità?? Il PING invia semplicemente un pacchetto di dati a un computer remoto, chiedendo a quel computer di rispondere. Se risponde, registra le informazioni su tale risposta per consentirti di elaborare e rivedere i risultati. Puoi farlo da solo usando il link indicato in precedenza (Speed-test), oppure il comando PING specifico per il tuo sistema operativo e dedicando il test al nostro sito web. I test che potresti eseguire dipendono dal tuo sistema operativo. Puoi trovare maggiori informazioni here.
- Se dovresei incontrare problemi, contattateci il prima possibile via email decrivendo il problema e saremo molto felici di aiutarti.
Adobe Connect meeting application
- Spesso i sistemi di conferenza ti chiedono di scaricare o aggiornare i componenti software aggiuntivi (ADD-INs) , si tratta di dispositivi software che possono essere aggiunti al tuo computer per fornire funzionalità o funzioni extra.
- E questo accadeva anche con Adobe Connect che chiedeva di installare/aggiormare FlashPlayer. Come probabilmente saprai, questo plug-in multipiattaforma è ancora molto diffuso per riproduce animazioni, video e file audio. Nel corso degli ultimi anni questo standard è stato soggetto a molteplici problematiche di sicurezza che ne hanno contribuito un graduale abbandono in termini di adozione da parte di produttori, webmaster e addetti ai lavori di soluzioni più recenti, innovative e versatili come l’HTML5 o WebGL, ed Adobe, colosso dell’informatica e dello sviluppo software, ha annunciato che questo standard verrà soppresso e abbandonato a partire dal 2020.
- Si noti che sebbene al momento non vi sia alcuna applicazione per Linux, gli utenti su Linux (Ubuntu, Red Hat e OpenSUSE) possono comunque partecipare, ospitare o partecipare alle riunioni nel browser.
La nuova versione di Adobe Connect permette di installare l'APP per riunioni Adobe Connect sia per desktop che per sistemi mobili. Questa applicazione può essere installata in due modi diversi
- può essere installata mediante lightning download automaticamente durante una riunione. Verrà richiesto di accettare il download quando si tenta di condividere lo schermo o utilizzare la funzionalità che richiede l'applicazione). Questo è il modo più comune per installare l'applicazione.
- Link all''APP ADOBE CONNECT DESKTOP per l'installazione
Puoi installarlo prima della riunione, utilizzando i programmi di installazione di seguito - https://www.adobe.com/go/ConnectShell11
- L'app store per il tuo cellulare/tablet (Android/IoS/Windows)
Extra informazioni riguardanti Adobe Connect dowloads and updates possono essere trovati here
Adobe Connect Test link e pagina per i troubleshotting
Adobe Connect offre anche @Adobe meeting Test, una pagina Web che è possibile utilizzare per verificare la connessione e installare componenti aggiuntivi e plug-in su richiesta. Il collegamento suggerito controlla i seguenti passaggi:
- Funzionalità del proprio desktop/laptop
- Accesso ad Adobe Connect
- Test di velocità LAN / DSL e larghezza di banda
- Componenti aggiuntiv iinstallati nel computer
Questa pagina include anche informazioni tecniche utili e risoluzione dei problemii
COME ACCEDERE?
Per maggiori informazioni su come accedere alla webinar room e come interagire con i relatori vedere la specifica sezione. Qui sintetizziamo le maggiori informazioni
- Riceverai le tue credenziali per accedere itramite un Uniform Resource Locator (URL), comunemente definito in modo formale un indirizzo web. Potresti anche ricevere un codice alfanumerico chiamato room passcode quando è richiesto un accesso riservato (vedi sezione accesso)
- Quando riceverai l'URL / room passcode via e-mail o se accederai a queste informazioni accedendo come utente registrato alla piattaforma ENEA EEN KE-SMEs, utilizza le tue credenziali per accedere al più presto e verifica che tutto funzioni correttamente ed informaci se incontrerai problemi.
NOTA IMPORTANTE!!!
Come accedete con l’APP alla room evento???
Dopo che avete cliccato con il mouse sul link dell’evento, il vostro browser vi chiedera’
“Vuoi passare all’app?” ( Edge) oppure “Vuoi aprire Adobe Connect?” (Google) oppure Per aprire questo link e’ necessario avviare un applicazione (Firefox). In tutti i casi va data una "risposta affermativa"
Non installate di nuovo l’app se l’avete gia’ installata
Verifica il tuo sistema (audio e microfono)
Dopo aver effettuato l'accesso alla stanza virtuale dell'evento (sala webinar) controlla l'audio (altoparlante / cuffia) usando il menu > Configurazione guidata audio> prova audio
- ~ 60-30 minuti per iniziare percepirai anche un po 'di voce, o suoni prodotti dai relatori ed assistenti.
- Regola il volume degli altoparlanti / cuffie se necessario
- Durante le presentazioni e alla fine di ogni webinar, i partecipanti possono interagire sia con la il pannel/moderatore che con i/i relatore/i tramite "live chat" (utilizza "chat pad". Lo troverai di solito nella parte destra o centrale dello schermo.
AUDIO SET-UP AND TROUBLES
- Fai attenzione che se non riesci ad ascoltare alcun suono o puoi ascoltarlo con un volume molto basso, probabilmente hai lasciato il volume dei tuoi altoparlanti / cuffie a un livello molto basso.
- Lo devi regolare cliccando sull'icona dell'altoparlante. Di solito è posizionato nella parte inferiore destra dello schermo. Fare clic con il mouse (pulsante sinistro) sull'icona dell'altoparlante e verificare il livello del volume.
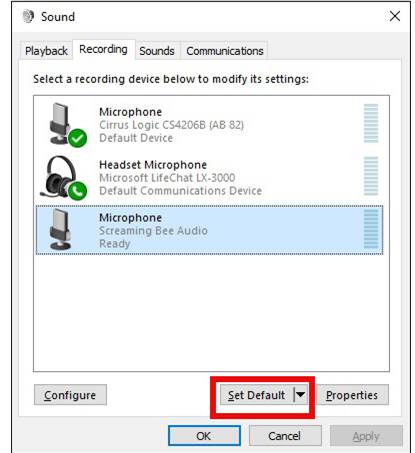
- Se fai clic sulla stessa icona dell'altoparlante con il pulsante destro del mouse (anziché il pulsante sinistro) puoi accedere a un menu più completo per controllare il Mixer del volume del tuo computer sia per gli strumenti di riproduzione (altoparlanti / cuffie) sia per gli strumenti di registrazione (microfono ), che i segnali che genera il sistema (es. outlook, il browser, etc etc)Vedi foto a destra.
- Puoi controllare e puoi selezionare qual è il tuo canale di riproduzione (uscita audio) preferito. Adobe Connect comunque utilizzerà il canale di riproduzione (suono di uscita) utilizzato dal sistema operativo per impostazione predefinita.
- Cambia canale di riproduzione, se riscontri problemi nell'utilizzo del canale di riproduzione predefinito impostato dal tuo computer.
- La Web cam/Microfono sono di solito autorizzatiesclusivamente a relatori / presentatori ma l'assistente / oppure il moderatore può anche autorizzare in via eccezionale l'accesso ai partecipanti registrati tramite microfono / web cam, su loro specifica richiesta, e se l'audio del microfono è preventivameente verificato.
Se partecipanti incontrano difficoltà / problemi audio, possono contattarci immediatamente tramite Adobe Connect Chat, email, telefono, skype (tempo limite ---> 30 minuti prima di iniziare)
ISTRUZIONI GENERALI AI RELATORI ED AI PARTECIPANTI
Laptop PC oppure Desktop PC?
Le persone non usano il PC desktop come in passato ed il relatore/moderatore ha probabilmente un laptop di altissima qualità, ben superiore rispetto al proprio PC desktop. Lasciamo sempre la scelta finale al relatore, ma verificheremo sempre che il computer del reklatore funzioni correttamente
- Pro -> laptop è l'altoparlante del computer che normalmente viene utilizzato. Un nuovo laptop è sempre aggiornato ed ha sempre una webcam e un microfono di alta qualità.
- Contro--> la qualità ottica di una webcam HD esterna utilizzata su un PC desktop è spesso di qualità superiore rispetto a una webcam per laptop. Inoltre, se il relatore inclina la vista del proprio schermo, il relatore inclina anche la vista della propria webcam. E i laptop molto vecchi hanno spesso un microfono di scarsa qualità,come una web cam di bassa qualità e spesso una ventola molto rumorosa del processore. Ciò produce una bassa qualità video / audio.
Indipendentemente dalla scelta del relatore riguardo il suo computer, come già indicato in precedenza,
- suggeriamo caldamente di aggiornare il sistema operativo e il browser Web 1-2 giorni prima dell'evento e ancora meglio anche qualche ora prima dell'inizio. Spesso le aziende ICT che òpropngono multipiattaforme aggiornano le loro strutture hardware e software durante la notte. E sarà un peccato che l'aggiornamento del sistema operativo potrebbe partire mentre stai facendo la tua presentazione bloccando l tuo computer.
- Controlla al più presto la velocità della tua connessione ed i componenti aggiuntivi tramite il link indicato sopra.
- Controllare la riproduzione dell'audio (informazioni nel paragrafo sopra) e il microfono e la webcam (vedere le sezioni seguenti).
Installare l'APP Adobe Connect Meeting
Questo passaggio è molto importante per i relatori in quanto necessitano di un controllo molto più ampio del sistema di teleconferenza rispetto ai partecipanti. Adobe Connect consente ai presentatori e agli host di riunioni di condividere i propri schermi, controllare gli schermi degli altri utenti e caricare i propri file nella riunione. L'utilizzo della visualizzazione classica tramite browser e Flash Player potrebbe limitare diverse funzioni
Come condividere documenti/files?? Come condividere lo schermo del proprio computer (relato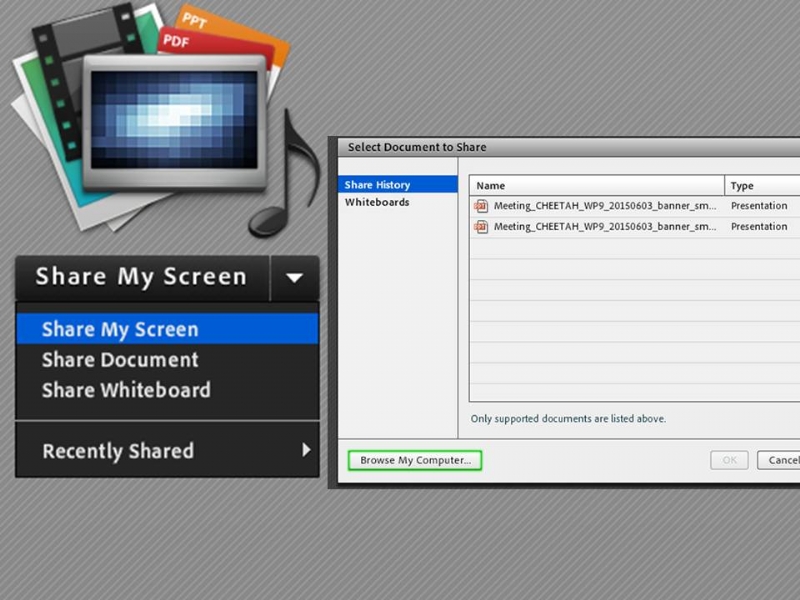
- i RELATORI / PRESENTATORI condividono i loro documenti (di solito file power point o pdf) selezionando diverse "opzioni di condivisione" offerte dal menu a discesa che appare sullo schermo del computer (vedi foto a destra)
- Gli oratori possono anche proporre visioni "live" del proprio schermo, usando la condivisione schermo dal menu, oppure anche apparecchiature/ esperimenti (live) utilizzando video, web cam
L'ACCESSO ALLA WEBCAM/MICROFONO E'SOLITAMENTE OFFERTO SOLO AI RELATORI/MODERATORI
Clicca con il pulsante sinistro del mouse sull'icona del microfono e/o della web cam per attivarle
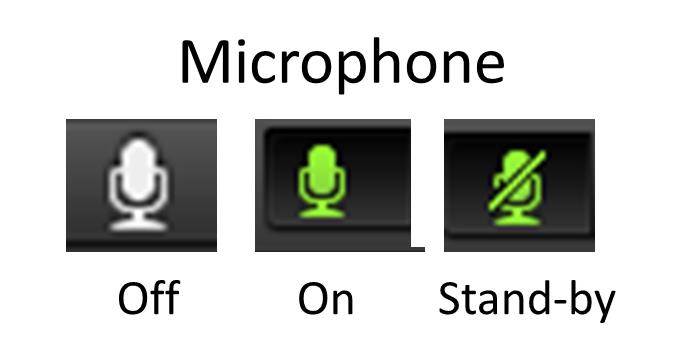
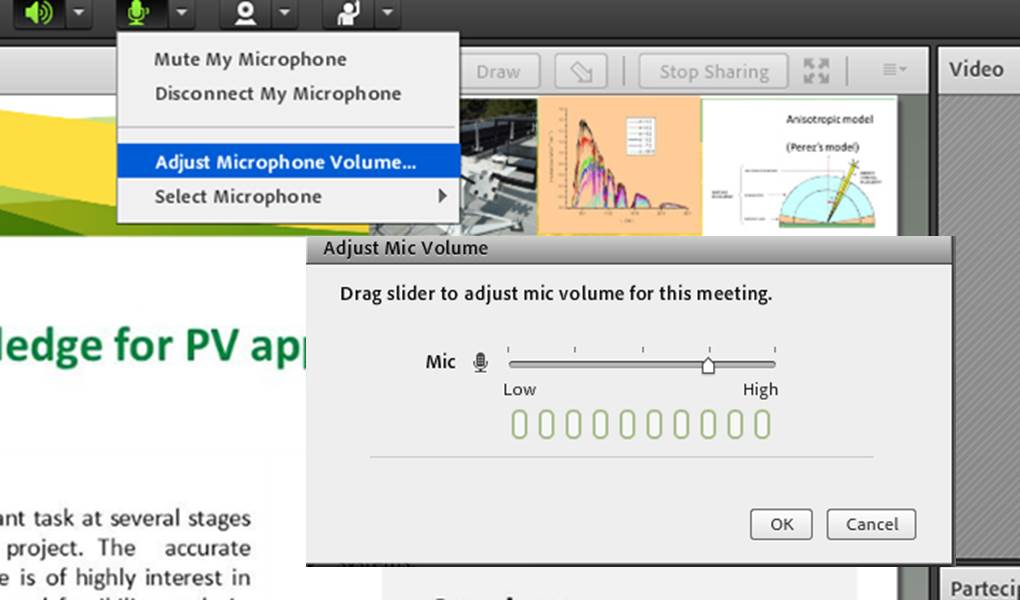
Facendo clic con il mouse sull'icona (pulsante sinistro) il colore cambia da grigio a verde. Se si preme di nuovo sull'icona, è possibile forzare il microfono in condizioni di stand-by (icona verde attraversata da una barra). Per regolare il volume del microfono è possibile accedere al pad del volume facendo clic sulla freccia accanto all'icona e selezionando Regola volume microfono
RELATORI/MODERATORI --- > MICROFONO ED AUDIO SET-UP
- Come accennato in precedenza, i relatori/moderatori possono controllare la qualità audio degli altoparlanti e del microfono tramite il menu in alto a sinistra Meeting > Audio Setup Wizard > test audio
- La qualità audio del microfono dei relatori/moderatori è molto importante e gli assistenti di KE-SMEs lo controlleranno correttamente prima di iniziare il webinar.
- Il microfono viene acceso / spento direttamente o in stand-by dal relatore/moderatore facendo clic sull'icona del microfono.
- Raccomandiamo caldamente di spegnere sempre il microfono quando non ne hai bisogno per evitare l'eco / il rumore durante altre presentazioni
- Ti consigliamo caldamente di utilizzare cuffie / cuffie e microfono digitale. Producono meno problemi audio rispetto agli altoparlanti e ai microfoni analogici (quelli che hanno uno connettore jack TS, TRS, TRRS e TRRRS, rispettivamente 2, 3, 4 e 5 contatti in luogo di un connettore USB
- Una web cam HD di alta qualità ha sempre un ottimo microfono digitale
- Se i relatori presentano i loro webinar in una sala conferenze, si prega di prestare sempre molta attenzione al rumore della stanza e alla risonanza / eco. In effetti, gli altoparlanti si accoppiano facilmente con il microfono e questo potrebbe causare un fastidiosissimo effetto di risonanza sonora, in particolare quando il sistema audio è direttamente accoppiato al computer.
- Tenere lontano il microfono dagli altoparlanti per evitare che i suoni possano essere accoppiati acusticamente (eco).
La qualità del microfono degli oratori e la pratica nel suo uso sono molto importanti per una conferenza web di successo e offriamo sempre sessioni di formazione a tutti gli oratori / moderatori interessati agli eventi
- Nel gestire la conversazione con il relatore/MODERATORE Impara dai telegiornali più che dai talk show UnaTelco non è una telefonata.:-) Se più di due relatori accendono il microfono contemporaneamente e non sincronizzano la pausa parlando invece tutti insieme, il suono viene accoppiato in modo così profondo ed il volume viene frequentemente modulato che può essere trasformato in un rumore terribile e la voce dei relatori/moderatori viene continuamente interrotta.
- In questa circostanza il pubblico non può ascoltare correttamente la voce degli oratori.
Consigliamo caldamente anche ai relatori / moderatori di ridurre il livello del volume per i segnali di alert di sistema (e-mail in arrivo, clic con il mouse, ecc.) Poiché di fronte tutti ascolteranno gli avvisi di sistema È possibile accedere al mixer pad tramite l'icona degli altoparlanti (vedere la sezione sopra)
SPEAKERS --- > WEB CAM
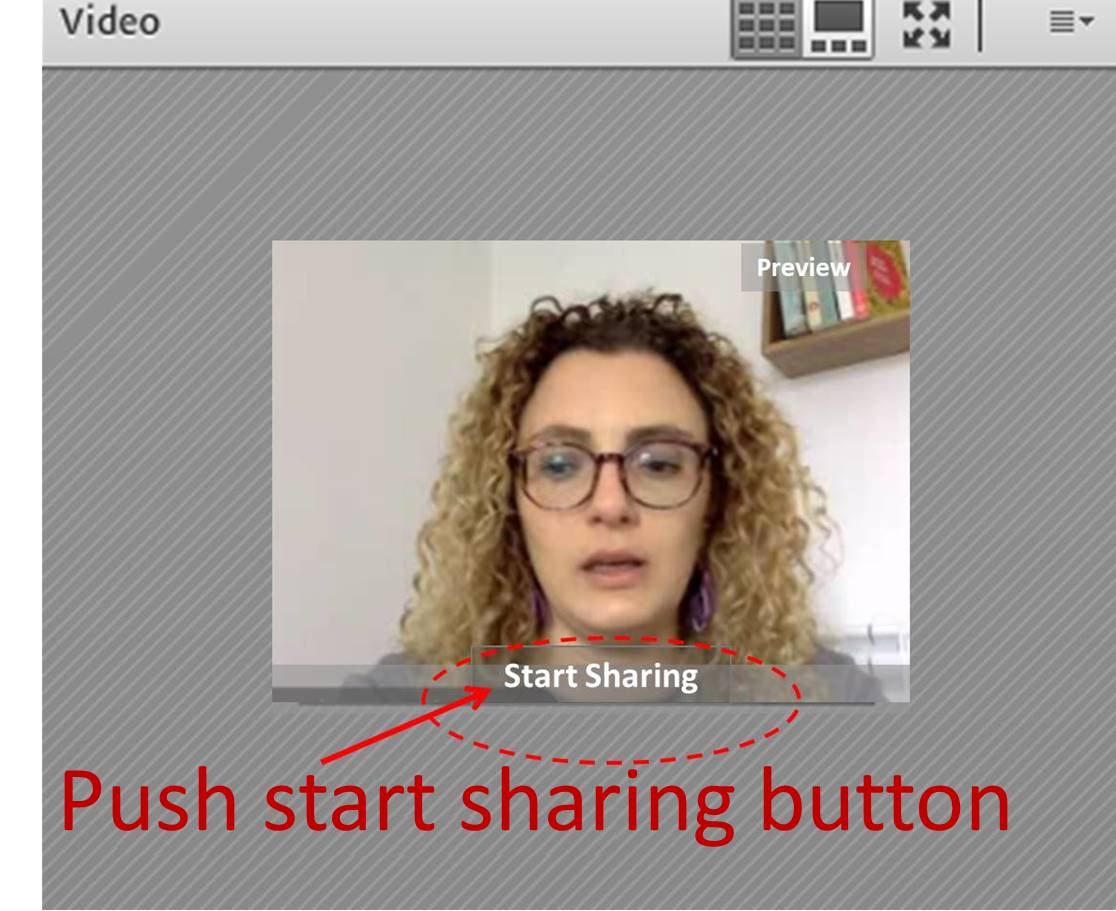
- La webcam deve essere attivata in due passaggi. Prima di tutto facendo clic con il mouse sull'icona "web cam". Ma la web cam per la privacy viene attivata in modalità stand-by (finestre di anteprima video) e l'icona della web cam passa dal colore "grigio" (spento / spento) al colore verde (acceso / acceso)
- Tuttavia è necessario premere il pulsante "Avvia condivisione" (start sharing) nella parte inferiore della finestra del video "Anteprima" della webcam
- Utilizza una webcam HD (1440p, 1080p o 720p)
- Evita una luce rilevante sulla schiena o dietro la testa. La web cam non funzionerà correttamente in questa condizione
TROUBLESHOOTING
Il problema potrebbe dipendere anche dal browser usato per navigare (Explorer, Firefox, Chrome, Safari etc )
Primo passo: controlla il seguente link
- http://connect.portici.enea.it/common/help/en/support/meeting_test.htm
- scarica il rapporto sul test di Adobe Connect ed Informa i tuoi colleghi ICT
- Fai questa verifica con i vari browseer che usi pià frequentemente
ALTRE INFORMAZIONI
- http://helpx.adobe.com/adobe-connect/kb/configure-ports-1935-443-80.html
- http://helpx.adobe.com/adobe-connect/kb/configuring-connect-professional-listen-additional.html
Probabilmente la configurazione del firewall / proxy della porta non soddisfa i seguenti requisiti:
- Porta 80 aperta TCP / UDP per traffico in entrata / in uscita
- La porta 1935 TCP / UDP aperta per il traffico in entrata / in uscita
Infatti alcuni firewall aziendali / server proxy bloccano la porta 1935 per il traffico di rete in entrata e in uscita
INSTRUCTION
ENEA EEN KE-SMEs is based on the lectures/presentation offered by tspeakers/trainers/presenters and the utilization of Adobe Connect ® an e-conferencing platform widely utilized in several organziations to propose on line seminars, conferences and e-learning.
NO special Hardware or Software is needed for either the presenters and the audience but
Please read carefully the instruction below:
NOTE: Whether you are a new and inexperienced user in web-conferencing or you are a skillful but you normaly use other webconferencing system than Adobe Connect we suggest you to pay attention to the following information. These advices come back from the lessons we have learned by interacting with more than 150 speakers and 2500 live participants, and this will help you in avoiding commonplace troubles.
INSTRUCTIONS TO THE PARTICIPANTS AND SPEAKERS
Following steps help both speakers and participants to get skills in using our webinar platform.
Speakers should also refer the specific section reserved to them to learn how to turn on/off web cam/microphone and to use them properly.
Check you computer :
- Update the operative system for your computer and update your web browser (Internet Explorer, Firefox, Chrome, Safari, etc) particularly if you don’t do this frequently. It will be a pity that the operative System (OS) or the browser of your computer will start to update during the webinar by blocking your computer and your activities for 10-15 minutes or more
- Install your multimedia tools if you have not already done it before:
- Participants need of the reproducing device i.e. loudspeakers and/or headset. and they don't need of web cam/microphone.
- Speakers/presenters must use both recording (microphone) and reproducing devices (audio). They also need of a (optional) webcam
- We warmly suggest speakers to use an headset instead of room loudspeakers becouse the sound of this ones often couples with microphone by producing annoying sounds effects and noise.
To check that your audio works properly please refer to following paragraph "audio setting and troubles"
Check internet connection speed and its quality
A rock-solid internet connection is the essential prerequisite for any effective remote conferencing.
Wi-Fi is obviously more convenient than wired Ethernet cables, but Ethernet still offers significant advantages in stability and speed, and we warmly reccomend particularly speakers to use LAN/Ethernet connection with assigned IP-Internet Protocol address, instead than a Wi-Fi connection with dynamic assigned IP.
A opposite we leave the participants free in chosing their connection.
- Internet datas are carried around in small chunks called packets. Connections speed is only a part the of the whole picture. The other one is the connection stability. If your connection experiences packet losses your browsing slows down, and it causes a decrease in audio/video quality..
- You can use a speed test like http://www.speedtest.net/ or any other one you love to test both uploading/downloading speed and PING- Packet INternet Groper .
- Connection speed > 0.4 Mbps (400 Kbps) or faster for both incoming/upcoming are welcome, particularly for the presenters/speakers becuse they need higher data transfer speed then participants. PING lower than < 50 ms welcome.
- How to Ping more deeply??? Pinging simply sends a data packet to a remote computer, asking that computer to respond. If it responds, it records information about that response for you to elaborate and review results. You can do it by yourselves by using PING command specific for your operative system and by dedicating the test to our web site. The tests you should perform depend from your operative system.You can find more information here.
- If you could meet troubles, let's know and we will be very happy to assist you. Please forward us an email by indicating any useful detail about the troubles you are facing.
Install FlashPlayer ®
- Often weconference systems ask you to download or update Add-in,These are devices and piece of software that can be added to your computer to give extra features or functions. And this also happen when you use Adobe Connect.
- Adobe Connect 9 meetings applications are backwards compatible with earlier versions of Adobe Connect. Please note that although there is currently no application for Linux, users on Linux (Ubuntu, Red Hat and OpenSUSE) can still attend, host, or present in meetings in the browser.
- Install/update FlashPlayer . Adobe Connect needs of FlahPlayer. As you probably know this is a very widely diffused cross-platform plugin plays animations, videos and sound files. We don't suggest you to install other software always Adobe propose you (McAfee, True Key, etc etc) except if you could specifically need of it, becouse istalled software could conflict with your software and Antivirus already installed in your computer.
- LINK TO DOWLOAD ADOBE CONNECT ADD-IN
If you don't intend to install FlashPlayer
- If you do not have Adobe Flash Player and you don't intend to install it, the new version of Adobe Connect suggest to install Adobe Connect meeting application. This application can be installed in two different ways
- Adobe Connect meeting application can be automatically installed during a meeting via lightning download (you will be prompted to accept the download upon attempting to screen share or use functionality that requires the application). This is the most common way to install the application.
- LINK TO ADOBE CONNECT MEETING APPLICATION
You can installed it before your meeting, using the installers below
Extra Adobe Connect dowloads and updates can be find here
Adobe Connect Test link and troubleshotting page
- Adobe Connect also offers @ Adobe meeting Test, a web page you can use to check your connection and install add-ins & plug-ins on request. The suggested link checks following steps:
i. - Flast player version installed in your computer
ii. - Access to Adobe Connect
iii.- LAN/DSL speed test and bandwith
iv.- Installed Add-in in your computer - This page also include useful technical information and troubleshoting.
HOW TO ACCESS?
For more information how to access to the webinar room and how interact with the speakers, see the specific section
We summarize here that:
- You will receive your credential to access based on a Uniform Resource Locator (URL), commonly informally termed a web address. You could also receive an alphanumeric code named room passcode, when restricted access is required (see access section)
- When you will receive URL / room passcode by email, or if you will access to this information by logging in as ENEA EEN KE-SMEs registered user, you should utilize your credentials to log-in asap and ckeck that everything works properly, and inform us if you will meet troubles. i
Check your listening device (audio)

- After logging in to the event virtual room (webinar room) check your audio (loudspeaker/headset) by using menu Meeting > Audio Setup Wizard > test audio (see photo)
- ~60-30 min to start you will also perceive some voice, sounds produced by speakers/assistents.
- Adjust the loudspeaks/headset volume if you could need of it.
- During the presentations and at the end of each lecture, partecipants can interact with both chair and speakers by "live chat" (pls utilize "chat pad". You will find it usually in the right side or central area of your screen.
AUDIO SET-UP AND TROUBLES
- Take care that if you could not listen any sounds or you could listen it by a very low volume, you have probably left the volume of your loudspeakers/headset at very low level.
- Adjust it by finding icon loudspeaker. It is usually placed in the right-bottom side of your screen. Click by mouse (left button) on the loudspeaker icon and check you volume level.. -- >
- If you will click on the same loudspeaker icon by right mouse button (instead then left button) you can have access to a more complete menu to control the Volume Mixer of your computer for both reproducing tools (loudspeakers/headset) and recording tools (microphone). See photo on right side.
- You can check and you can select which is your reproducing channel (output audio). Adobe Connect will use the reproducing channel (output sound) that you operative system use by default.
- Change reproducing channel, if you would change it or if you are finding troubles in utilizing the default reproducing channel is set by your computer.
- VIDEO/MICROPHONE is authorized to Speakers/presenters only but assistant/chair can also exceptionally authorize the access by microphone/web cam for the registered partecipants on their specific request.
If participants meet audio difficulties/troubles, they can contact us very quickly by adobe connect chat, email, phone , skype (time limit ---> 30 min to start)
INSTRUCTIONS TO THE PARTICIPANTS AND SPEAKERS
Laptop or a Desktop PC?
People don’t use desktop as in the past, and speaker has probably a laptop of higher quality than his/her own desktop PC. We leave always the final chose to the speaker and we will check that speaker's computer works properly
- Pro -- > laptop is the computer speaker probably normally use . A new laptop is always updated and it has always an high quality web cam and microphone.
- Cons-- > the optical quality of an external HD web cam use on a desktop PC is often of higher quality that a laptop web cam. Furthermore If the speaker tilt the view of his/her screen, speaker also tilts the view of his/her web cam. And very old laptops have often ow quality microphone, low quality web cam and noisily processor fan. This produce low video/audio quality.
Not depending from the speaker chose, as already indicated above,
- we warmly suggest to update the OS-Operative System and Web-browser 1-2 days to the event and once again few hours before starting. Often multi-platform ICT companies update their facilities and software overnight. And it will be a puity that the Operative system updating will block your computer.
- Check asap your speed connection, FlashPlayer and add-in by link indicated above. Check reproducing audio (information in paragraph above) and your microphone and webcam (see sections below) above).
Install the Adobe Connect Meeting APP:
This step is very important for the speakers/presenters as they need much more control of the teleconferencing system than attendees. Adobe Connect APP allows presenters and meeting hosts to share their screens, control other users' screens, and upload their own files to the meeting. Using the classic view via browser and Flash Player may limit several functions
How to share documents/files? How to show them on video to all participants?
- SPEAKERS/PRESENTERS share their document (usually power point or pdf files) by selecting different "sharing option" offered by the drop-down menu appearing on the computer screen (see photo on right side)
- The speakers can also propose (live) experiments or they can show equipments/ testing/ characterization procedures/ by using video, web cam
ACCESS TO WEBCAM/MICROPHONE IS USUALLY OFFERED TO SPEAKERS/PRESENTERS ONLY
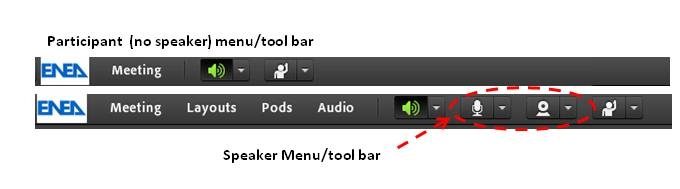
Mouse Click on microphone or web cam icon to turn on/off them
By mouse clicking the icon colour changes from grey to green. If you push once again on the icon you can force microphone in stand-by condition (icon crossed by a bar). To adjust microphone volume you can have acces to the volume pad by clicking on the arrow next to the icon and by selecting Adjust Microphone volume
SPEAKERS --- > MICROPHONE AUDIO SET UP
- As mentioned above, speakers can check by themselves microphone by menu Meeting > Audio Setup Wizard > test audio (see photo above) but audio quality of speaker microphone is very important and KE-SMEs assistants will check this properly before starting the webinar.
- Microphone is directly turned on/off or in stand-by by speaker/presenter clicking on microphone icon.
- We warmly recommend to turn always off microphone when you doesn’t need of it in order to avoid echo/noise during other presentations
- We warmly suggest you to use headphone/headset and digital microphone. They produce less audio troubles than loudspeakers and analog microphone. And always a HD web cam has a high quality digital microphone .
- If speaker(s) present their webinar(s) in a conference room, please always pay tightly attention to the room noise and resonance/echo. In fact loudspeakers easily couple with microphone and this could cause a damned annoying sound resonance effect, particularly when audio system is directly coupled to computer line-out.
- keep away microphone from the loudspakers to avoid that sounds could be acustically coupled (echo).
- The quality of speaker(s) microphone and the practice in its use is very important for a successful webconference and We always offer training session to any interested speaker/event chairperson(s)
- Learn from TV newscast more than talk show Telco isn’t a phone call. If more than two speakers turn on the microphone and they don’t synchronize their pause by speaking all togetherthe sound is coupled so deeply and frequently modulated in volume that terrible noise can be produced , and the speakers/presenters voice is continuosly break. In this circumstance audience cannot listen properly the speakers' voice.
- We also warmly suggest presenters/speakers to reduce the volume level for the system signal allert (email arriving, click by mouse, etc) as opposite everyone will listen your system alerts You can access to mixer pad by loudspeakers icon (see section above).
SPEAKERS --- > WEB CAM
- Webcam needs of a two steps process to be switched on.
- First of all by mouse clicking on "web cam icon". The web cam is turned from off to stand-by mode (video preview windows) and the web cam icon change from "grey" color (turned/off) to green color (turned/on)
- Further, you must push "start sharing" bottom you can find in the web cam "Preview" video windows
- Utilize an HD web cam (1440p, 1080p o 720p)
- Avoid relevant light in your back. Web cam will not work properly in this condition
TROUBLESHOOTING
If you will find difficulties please contact us by email, phone , skype (time limit ---> 30 min to start)
Firts step: check following link
http://connect.portici.enea.it/common/help/en/support/meeting_test.htm
It is very important that yoy check this link with all browsers that yoy frequently use (Explorer, Firefox, Chrome, etc etc)
Further information:
Indicated link report Adobe Connect Meeting Test/Troubleshooting Tips. Inform your ICT colleagues.
- http://helpx.adobe.com/adobe-connect/kb/configure-ports-1935-443-80.html
- http://helpx.adobe.com/adobe-connect/kb/configuring-connect-professional-listen-additional.html
Probably your port firewall/proxy configuration is not meeting the following:
- Port 80 open TCP/UDP for incoming /outcoming traffic
- Port 1935 open TCP/UDP for incoming /outcoming traffic
In fact some corporate firewall/proxy server blocks port 1935 for incoming and outgoing network traffic